I managed to 'baked' 4 recipes off my list for the past 2 weeks. They are red velvet cupcakes, poptarts, scones and lychee cupcakes.
Wednesday, 8 August 2012
'baking' off the list
My 'to-bake' list is always lengthening. No matter how hard I try to 'bake' them off the list, the list doesnt seem to shorten as much as it is being lengthen.
Friday, 27 July 2012
Macarons - luck or not (Updated)
Macarons though made up of few ingredients and what seems to be simple steps are just hell of a pain in the butt. Trust me, unless you have mastered the art of macaron =x Obviously I have not. Sometimes my macarons turned out flat with feets, at times uneven feets and once in a blue moon with NOOOOOO FEEEEEETS!!!!! *looking guilty* (yes I graduated from LCB) These never once occurred to me when I bake them in London! I am serious! I swear (Som Pa!)! I only failed once when I made them in London out of the 3-4 batches. Reason being, I baked them at the wrong temperature.
How the hell did my macarons not bake well in SG. It can't happen that all those macarons baking in London were just lucky times where I whisked my egg whites to the right stiffness and I fold my macaronage to the right consistency. TT Don't tell me it is LUCK! NOOOOOOO!!!! sob sob.. I feel so ashamed since I have yet to baked the perfect macaron in Singapore. :(
Making macarons are like a nightmare to me here in Singapore. It was so much easier in school just because we have professional chefs watching our every move like an eagle eyeing its prey. In class you can always hear us calling out to chef: 'Chef~~ is this all right? Do I need to whisk it more? How does this consistency look? All right? CHEF~~~' hahaha that is what the classroom sounds like all the time with us girls calling out to chef in our sweetest voice 'Chef~~~' lol..miss those days.
Back to baking macarons in Singapore. I blame it on the weather, I blame it on the ingredients and finally I blame it on myself. Obviously the first 2 reasons are just excuses else shops selling macarons in Singapore will lose their business.
There are 2 methods of making macarons (as far as I know). Method 1 being the combination of dry ingredients to the stiff meringue. Method 2 being the Pierre Herme method of using Italian meringue. Many preferred method 2 as it is more stable, however, it is more tedious as you have to boil sugar to certain temperature before adding it to slightly whisked egg white and continue whisking till stiff. Of course I would prefer method 1 since it is much simpler and the fact that I do not have a Kitchen Aid makes it harder to make italian meringue.
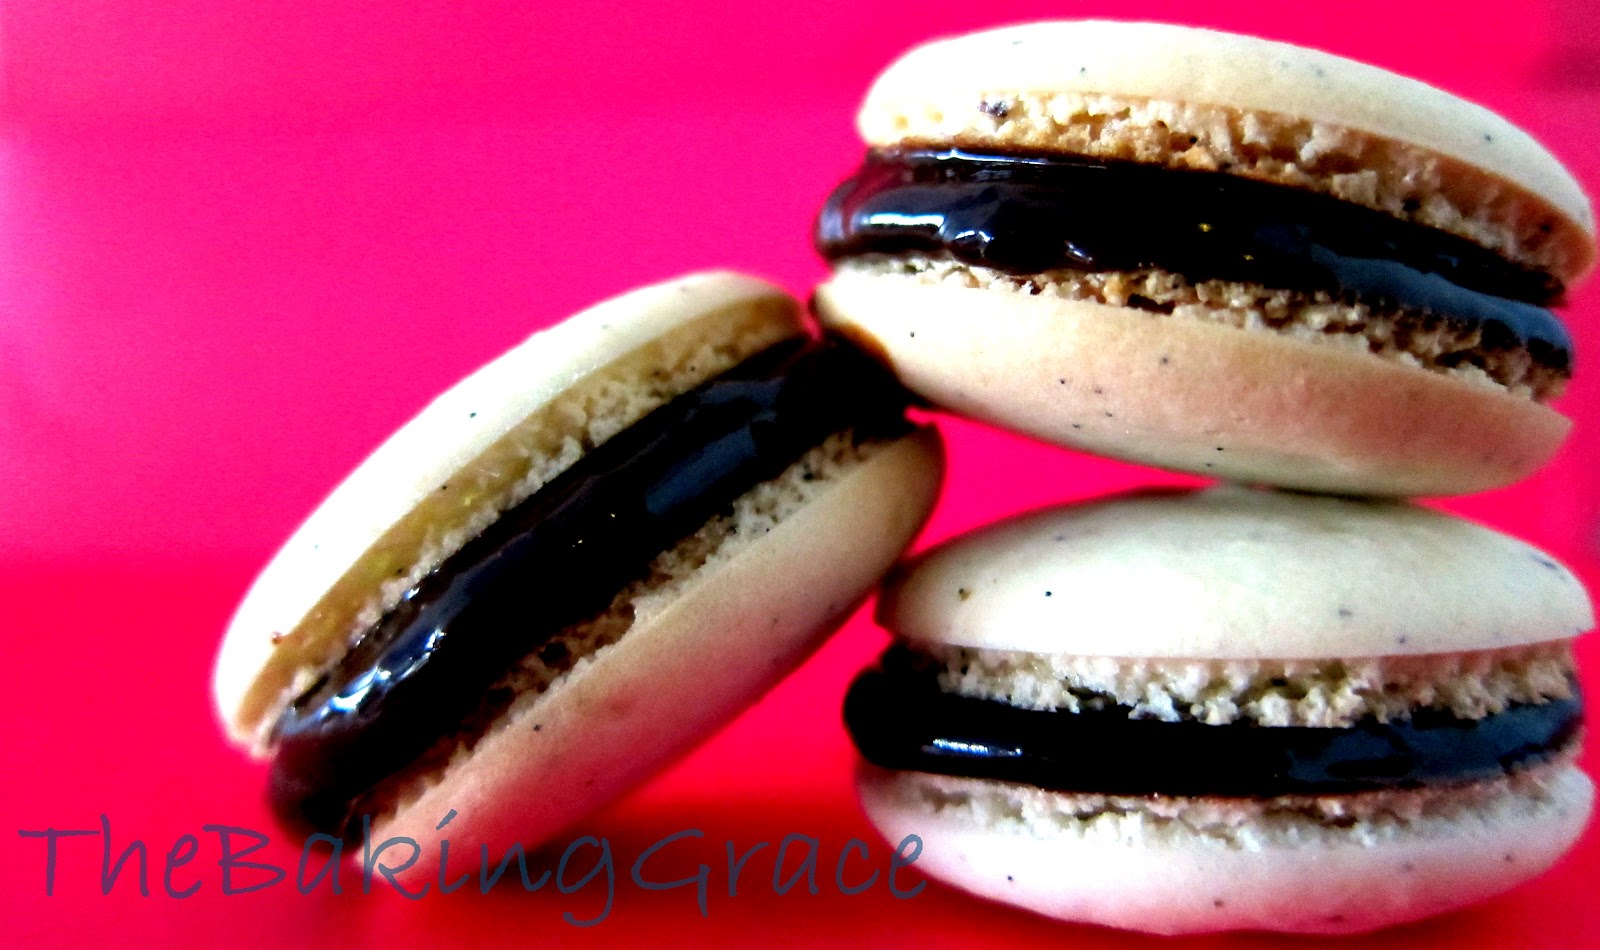
Even though I have not mastered the Art of Macarons Making, I believe that it boils down to perfecting the skills and techniques which is the ability to gauge the 'PEAKNESS' OF THE MERINGUE as well as the CONSISTENCY OF THE MACARONAGE. I had been experimenting, watching and taking notes on those 2 important points and this is by far the best that I had made.
Yes I know it is still a long way to perfection. At least, they tasted all right ( I wouldn't say it is good. Comparing mine to Canele's, let alone Pierre Herme's macaron, OH please. Throw these away.), no cracked shells and there are feets. Though, I could have baked them longer I believe.
As much as I hate to say, I am still on the 'staring anxiously at the oven of macarons, praying for feets and non-crack shells' mode which obviously I would wished to overcome. I want to bake perfect macarons, batch after batch. Hence, knowing where went wrong is exactly important as the 2 important points. So I did research and read up a bit here and there. Guess what I found. Someone named Stella Parks, blogger of BraveTart, who isvery very obsessed over macarons. I was wowed by her determination of the many experiments she did to come up with the reasoning to failed macarons. For those of you who had been trying to bake macarons and failed, you are in for something awesome! There are many explanations and understanding (not sure if I can consider them as tips) on baking macarons. I would say the posts are her 'The Study of Macarons' Read it up and be prepared for the MACARON WAR!
Disclaimer: I wouldn't be 100% sure that your batch of macaron will turn out good even following the post religiously. As I had said and Stella had mentioned in her post, it still boils down to the 2 important points that I had stated in order to make the perfect looking macarons. Also, she had stated that macaron mishaps happens from time to time. At least you will know where you went wrong after reading her posts :)
Good luck with your war while I shall battle mine :)
xx,
TBG
p.s. If resources allows me (time, camera and my Goldfish memory), I will snap pictures of the step by step baking process and share it with you in my future post. :D
Updates (27 July 2012)
I had tried out Stella's Recipe and it worked just fine, except the following variations which I did just to experiment a little.
Remembering clearly and reading many macaron posts, my French Chef told us that the shells have to crust before putting into the oven. Even Peirre Herme did that! But Stella said that there is no such need. ZOMG isn't that amazing?!!! Of course I believed her. She had baked so many macarons that I doubt she can even count how many she had baked to date. However, I was a little doubtful of my skills and didnt want to throw my entire macaron batch into the bin. So I played it save by experimenting a little here and there.
Experiment 1
- piped macaron shells onto parchment paper
- baked directly in the oven without waiting for them to crust
- baked without oven fan.
Result - No feet. It is like baked meringue. Slightly cracked. Peels off from parchment.
Experiment 2
Result - No feet. It is like baked meringue again. No cracks. Peels off from parchment.
Experiment 3
- piped macaron shells on Silpat
- baked only after macaron shell forms a layer of thicker crust
- baked with oven fan.
Result - Uneven feet (I blame this on my oven). No cracks. Peels off from Silpat.
Conclusion
- There is no difference in using Parchment paper or Silpat except that you will have to adjust the baking time since Parchment paper is thinner than Silpat.
- It would be good if Stella post step by step photos of the macaronage making process. (Just so we can gauge the stiffness of the meringue and the consistency of the macaronage)
Conclusion (that needs to be verify)
- it could be the crusting of pre-bake macaron shells resulted in the feets appearing.
- it could also be the usage of oven fan that resulted in the appearance of the feets.
Hence, I need to experiment another time with the effect of pre-bake crusting and usage of oven fan.
p.s. To play it safe, I think crusting must be done and before that, you need release air bubbles of the piped macaron shells to prevent cracked shells.
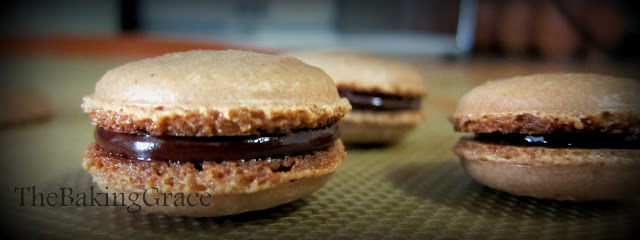
These are the macarons that I had made from Stella's recipe. It worked! :) btw, it is Earl Grey Milk Chocolate.

How the hell did my macarons not bake well in SG. It can't happen that all those macarons baking in London were just lucky times where I whisked my egg whites to the right stiffness and I fold my macaronage to the right consistency. TT Don't tell me it is LUCK! NOOOOOOO!!!! sob sob.. I feel so ashamed since I have yet to baked the perfect macaron in Singapore. :(
Making macarons are like a nightmare to me here in Singapore. It was so much easier in school just because we have professional chefs watching our every move like an eagle eyeing its prey. In class you can always hear us calling out to chef: 'Chef~~ is this all right? Do I need to whisk it more? How does this consistency look? All right? CHEF~~~' hahaha that is what the classroom sounds like all the time with us girls calling out to chef in our sweetest voice 'Chef~~~' lol..miss those days.
Back to baking macarons in Singapore. I blame it on the weather, I blame it on the ingredients and finally I blame it on myself. Obviously the first 2 reasons are just excuses else shops selling macarons in Singapore will lose their business.
There are 2 methods of making macarons (as far as I know). Method 1 being the combination of dry ingredients to the stiff meringue. Method 2 being the Pierre Herme method of using Italian meringue. Many preferred method 2 as it is more stable, however, it is more tedious as you have to boil sugar to certain temperature before adding it to slightly whisked egg white and continue whisking till stiff. Of course I would prefer method 1 since it is much simpler and the fact that I do not have a Kitchen Aid makes it harder to make italian meringue.
Even though I have not mastered the Art of Macarons Making, I believe that it boils down to perfecting the skills and techniques which is the ability to gauge the 'PEAKNESS' OF THE MERINGUE as well as the CONSISTENCY OF THE MACARONAGE. I had been experimenting, watching and taking notes on those 2 important points and this is by far the best that I had made.

Yes I know it is still a long way to perfection. At least, they tasted all right ( I wouldn't say it is good. Comparing mine to Canele's, let alone Pierre Herme's macaron, OH please. Throw these away.), no cracked shells and there are feets. Though, I could have baked them longer I believe.
As much as I hate to say, I am still on the 'staring anxiously at the oven of macarons, praying for feets and non-crack shells' mode which obviously I would wished to overcome. I want to bake perfect macarons, batch after batch. Hence, knowing where went wrong is exactly important as the 2 important points. So I did research and read up a bit here and there. Guess what I found. Someone named Stella Parks, blogger of BraveTart, who is
Disclaimer: I wouldn't be 100% sure that your batch of macaron will turn out good even following the post religiously. As I had said and Stella had mentioned in her post, it still boils down to the 2 important points that I had stated in order to make the perfect looking macarons. Also, she had stated that macaron mishaps happens from time to time. At least you will know where you went wrong after reading her posts :)
Good luck with your war while I shall battle mine :)
xx,
TBG
p.s. If resources allows me (time, camera and my Goldfish memory), I will snap pictures of the step by step baking process and share it with you in my future post. :D
Updates (27 July 2012)
I had tried out Stella's Recipe and it worked just fine, except the following variations which I did just to experiment a little.
Remembering clearly and reading many macaron posts, my French Chef told us that the shells have to crust before putting into the oven. Even Peirre Herme did that! But Stella said that there is no such need. ZOMG isn't that amazing?!!! Of course I believed her. She had baked so many macarons that I doubt she can even count how many she had baked to date. However, I was a little doubtful of my skills and didnt want to throw my entire macaron batch into the bin. So I played it save by experimenting a little here and there.
Experiment 1
- piped macaron shells onto parchment paper
- baked directly in the oven without waiting for them to crust
- baked without oven fan.
Result - No feet. It is like baked meringue. Slightly cracked. Peels off from parchment.
Experiment 2
- piped macaron shells onto parchment paper
- baked after a layer of thin film forms
- baked without oven fan.Result - No feet. It is like baked meringue again. No cracks. Peels off from parchment.
Experiment 3
- piped macaron shells on Silpat
- baked only after macaron shell forms a layer of thicker crust
- baked with oven fan.
Result - Uneven feet (I blame this on my oven). No cracks. Peels off from Silpat.
Conclusion
- There is no difference in using Parchment paper or Silpat except that you will have to adjust the baking time since Parchment paper is thinner than Silpat.
- It would be good if Stella post step by step photos of the macaronage making process. (Just so we can gauge the stiffness of the meringue and the consistency of the macaronage)
Conclusion (that needs to be verify)
- it could be the crusting of pre-bake macaron shells resulted in the feets appearing.
- it could also be the usage of oven fan that resulted in the appearance of the feets.
Hence, I need to experiment another time with the effect of pre-bake crusting and usage of oven fan.
p.s. To play it safe, I think crusting must be done and before that, you need release air bubbles of the piped macaron shells to prevent cracked shells.
These are the macarons that I had made from Stella's recipe. It worked! :) btw, it is Earl Grey Milk Chocolate.
Saturday, 21 July 2012
What's rolling in the kitchen
Earl Grey Chocolate Cupcakes, Red Velvet Cake and Celebration Cakes were some of the creations that were 'rolling' in my kitchen lately.


I was quite surprised to know that Earl Grey works hand in hand with Chocolate. I mean I had read and heard that they go well together but I never really believe that they do. hmmm do you know what I mean =x oh well now that I had made it, I believed. Just like the phrase: 'seeing is believing' but just in this case, 'tasting is believing' lol

The Red Velvet Cake was an impromptu order from Friend A which was quite a success. phew! Sadly I do not have a photo of it. It is the first REDDEST cake sponge I had made. haha..I told my Mom, I am gonna pour the entire bottle of red liquid colouring into the batter and she gave me the look 'OMG! you are NOT serious are you?!' hahaha.. I poured the entire bottle of red colouring, combine it into the batter and showed it to her. She was like 'Yuck! The colour looks disgusting, it is like the colour of pig's liver!' wahahaha how can she compare my red sponge batter to a pig's liver! humph! I guessed the batter colour turned out that way because I was too 'generous' with the addition of the cocoa powder to the batter. =x Thankfully the sponge turned out red after baking. Though I think it should be redder. oh well I will remember that and not be too 'generous'. kekeke.
The next project being Captain America Cake which I had butterflies in my tummy when making. Like really really. I was told to make it long before. I prepared for it (the ingredients, the drawings, the colourings, etc) and even made a tiny sample (as small as a teacup) of it just to be sure I would not screw it up.
The tiny sample

At first I had problem with the royal icing piping. As you can see from the sample the lines created using the star tip was not visible. My icing was to runny!!! TT (NB: the piping on the tiny sample was really tough. hence the crooked and uneven piping.) Not only that, I had problem with the colours as well. I added tons of blue paste, but the royal icing just would not turn as blue as I want it to be. Captain America blue to be exact. :( *sniff sniff* I was about to break down. (haha just kidding) Only to realize, the colour actually darkens if you let it rest in the fridge in an air tight container for a day or two and also the icing will darken further when dried...geez i think i had wasted tons of my colour paste. Another lesson learnt. I redid my royal icing so that it is much much thicker. Thankfully it worked. The lines are visible!
So here is the final product. Ta-Dahhhhhh....

Oh apart from the tiny sample, I also did a tiny celebration cake for the 4th July which looked like a little pressie ^^

All righty I shall end off and head to bed. ;) Sweet Dreams.
xx,
TBG
Friday, 22 June 2012
It's the Sissy's Birthday!!!
and she is off to the airport heading to BKK for an awesome time EATING and SHOPPING!!!! -.- i also wanna go!!!! sob sob TT all right enough of my nonsense. BOO HOO :(
We celebrated her birthday yesterday where I made a plain and simple cake - Strawberry Shortcake. It is basically 2 layers of Genoise (thick, airy and spongy) soaked in syrup (I soaked mine with Cointreau syrup) with sliced strawberries and Creme Chantilly (aka sweeten whipped cream) in between. I diced my strawberries and macerate it with Cointreau syrup for an hour. Only to find that, I need to add more Cointreau or probably macerate them longer in the syrup.
Hmmm can you picture the Strawberry Shortcake that I had made? If not, look below :)

I made another version, looking similar to Fraisier (which is made up of 2 layers of syrup soaked Genoise, lined with halved strawberries with Vanilla Creme Mousseline sandwiched in between. A layer of Baby Pink Marzipan will usually me laid above the top Genoise and decorated with royal icing piping). All right maybe you would wanna google image 'Fraisier Cake' to take a look. I am sure it will make more sense after googling. :)
 This cake is for my dearest friend's Anniversary :) Wishing her and her other half the best. Forever and Always ^^
xx,
TBG
P.S i caught some unglam photos of my sister. It was a surprise birthday celebration - i love surprises!!! Big Sis came out of the bedroom wearing her PJs and wrapped a 'turban' on her head (muahahahaha) All of us (my nephew aka Big O stayed over her my house together with my parents) sang Birthday song as soon as she came out of the room. She was shocked and said 'OMG why now?!!! with me wearing PJs and a turban?!!' hahahaha that moment was hilarious..keke...I shant post the unglam shots and let her do the honor on FB instead. keke funny moments ^^ HAPPY BIRTHDAY BIG SIS! たんじょうびおめでとう~ 생일축하합니다~
We celebrated her birthday yesterday where I made a plain and simple cake - Strawberry Shortcake. It is basically 2 layers of Genoise (thick, airy and spongy) soaked in syrup (I soaked mine with Cointreau syrup) with sliced strawberries and Creme Chantilly (aka sweeten whipped cream) in between. I diced my strawberries and macerate it with Cointreau syrup for an hour. Only to find that, I need to add more Cointreau or probably macerate them longer in the syrup.
Hmmm can you picture the Strawberry Shortcake that I had made? If not, look below :)

I made another version, looking similar to Fraisier (which is made up of 2 layers of syrup soaked Genoise, lined with halved strawberries with Vanilla Creme Mousseline sandwiched in between. A layer of Baby Pink Marzipan will usually me laid above the top Genoise and decorated with royal icing piping). All right maybe you would wanna google image 'Fraisier Cake' to take a look. I am sure it will make more sense after googling. :)

xx,
TBG
P.S i caught some unglam photos of my sister. It was a surprise birthday celebration - i love surprises!!! Big Sis came out of the bedroom wearing her PJs and wrapped a 'turban' on her head (muahahahaha) All of us (my nephew aka Big O stayed over her my house together with my parents) sang Birthday song as soon as she came out of the room. She was shocked and said 'OMG why now?!!! with me wearing PJs and a turban?!!' hahahaha that moment was hilarious..keke...I shant post the unglam shots and let her do the honor on FB instead. keke funny moments ^^ HAPPY BIRTHDAY BIG SIS! たんじょうびおめでとう~ 생일축하합니다~
Friday, 15 June 2012
Lychee experiment #2
Tried making an Ispahan Cake which is the combination of Lychee, Raspberry and Rose. I got the recipe from SweetToothFairy.
Basically the cake should be quite a success except for the fact that... I had decided to try my new purchase of Phoon Huat's gelatin which I conclude that I should just stick to using Bake King's gelatin. The lychee jelly that I made were kinda soft as you can see from the photo below, maybe I need to double the dosage when it comes to using PH gelatin. :(
I got my rose water from London which I had not done any 'open ceremony' for it as yet. keke...finally I found my chance to do so. anw the verdict for this cake was...mehhhhh -.- it wasn't fragrant enough, in fact it tasted kinda bland. i wonder what I did was wrong or was it supposed to taste like that.
I changed the jelly portion where I didn't use any puree (puree is not cheap here...*sobs*) I guess that was the reason why. The next time I am gonna puree my lychees (lychees ain't that ex in SG) as well as changing raspberries to strawberries [still very ex but 'bo bian' (aka 'no choice')] as raspberries are not easily available in SG unless I pop over to PH to buy the frozen raspberries or raspberry puree.
The rose mousse was overpowered by the vanilla pod that I added to the cream which smells so vanilla..hmm am I making any sense? Also, I didn't have any rose bud and hence, I only added rose water :( ZOMG!!! i just searched online and found that 50g of Rose buds cost SGD26!!!! geez...if the experiment continues like that 'confirm broke' (excuse me for my Singlish)
Moving on to the sponge, I was quite satisfied with it. The texture was light, moist and smooth. Just a touch too soft, making it slightly difficult to handle. Other than that, it was great :)
All right I shall present to you a picture of my not so pretty and not so well made Ispahan Cake...Actually the red portion of the cake looks quite pretty isn't it =x

That's all folks. I will make sure it will be better the next time round.
xx,
TBG
Monday, 11 June 2012
Malty Milo ^.^ Happy Birthday Middle O!
Milo lovers, this post is for you!
Milo is a malty chocolaty energy drink that I grew up with. Almost everyday, Mommy will always make a cup of hot Milo for me and my sisters (Morning before I leave house for school/work or at night before I head to bed). There is one habit that I cannot get rid off when making myself a cup of milo and that is to eat one or two big spoonful of Milo powder. You must be smiling and nodding to yourself as you read it right? keke...because you do that all the time as well!!! For those who didn't and have not tried eating Milo powder, don't look at me that way...you seriously are missing out BIG BIG time! The taste of Malty Chocolate is just like heaven! (not that I had been to heaven but it really just feel heavenly when you eat it. try it and you will know what I mean)
This recipe had been bookmarked for many years =x and since it is Middle O's birthday (12 June to be exact and btw she's my niece aka GodChild), I had decided to make milo Cupcakes instead of a fanciful castle that I had intended to make. The recipe is taken from this website. It is really easy to make. Quick and yummy :) You might want to alter the recipe a little as I did where I reduced the amount of sugar to my liking (I have a very low threshold when it comes to sugar). Also, I halved the frosting recipe and it was just right.


Now photos of the Milo cupcakes!!!


Milo is a malty chocolaty energy drink that I grew up with. Almost everyday, Mommy will always make a cup of hot Milo for me and my sisters (Morning before I leave house for school/work or at night before I head to bed). There is one habit that I cannot get rid off when making myself a cup of milo and that is to eat one or two big spoonful of Milo powder. You must be smiling and nodding to yourself as you read it right? keke...because you do that all the time as well!!! For those who didn't and have not tried eating Milo powder, don't look at me that way...you seriously are missing out BIG BIG time! The taste of Malty Chocolate is just like heaven! (not that I had been to heaven but it really just feel heavenly when you eat it. try it and you will know what I mean)
This recipe had been bookmarked for many years =x and since it is Middle O's birthday (12 June to be exact and btw she's my niece aka GodChild), I had decided to make milo Cupcakes instead of a fanciful castle that I had intended to make. The recipe is taken from this website. It is really easy to make. Quick and yummy :) You might want to alter the recipe a little as I did where I reduced the amount of sugar to my liking (I have a very low threshold when it comes to sugar). Also, I halved the frosting recipe and it was just right.
One thing I like about this recipe is that, the recipe contains MILO! ok yes that is one of the main reason. Another reason is...the recipe does not contain a lot of butter and sugar!!! ^^V
The cupcake tasted Malty, Chocolaty, Moist, Sugary sweet but not too sweet, HEAVENLY!
Below are the photos I had taken during the mini birthday celebration, followed by the recipe.
The cupcake tasted Malty, Chocolaty, Moist, Sugary sweet but not too sweet, HEAVENLY!
Below are the photos I had taken during the mini birthday celebration, followed by the recipe.
It is a tradition to eat eggs that are dyed in red for birthday..hence, Mommy dyed some red quail eggs for the children.

This is Middle O


This is BB O


This is Big O


She is 5!


They love it to the max and wanted a 2nd serving..but...to be honest...Milo is kinda 'heaty' hence you need to drink lots of water after eating it.


Now photos of the Milo cupcakes!!!


MILO CUPCAKES
Time 20-40 minutes
Time 20-40 minutes
Difficulty - Easy
Serves 12
Ingredients
Cupcakes
115g Plain Flour
140g Caster Sugar
1.5 teaspoons Baking Powder
Pinch salt
40g Unsalted Butter, room temperature
120 ml Whole Milk
3 tablespoons Milo
2 teaspoons Cocoa Powder
1 Egg
Milo Frosting
300g Icing Sugar
100g Unsalted Butter, at room temperature
40g Cocoa Powder, sifted
40 ml Whole Milk
2 teaspoons Milo
(Adapted from Vanilla Cupcake recipe, The Hummingbird Bakery Cookbook)
Method
Preheat the oven to 170 degrees celsius. Line a 12-hole muffin tray with patty cases.
Put the flour, sugar, baking powder, salt and butter in a medium bowl and beat with an electric mixer until everything is combined.
In a jug, stir the Milo into the milk until the milk turns chocolate coloured. Add 60ml of the milk mixture to the batter and whisk until just incorporated.
Lightly beat the egg, the pour the egg and remaining milk into the batter and beat until mixture is smooth. Do not overmix.
Spoon the mix into the paper cases until two-thirds full. Bake in preheated oven for 20 minutes, or until the cakes bounce back when touched and a skewer comes out clean.
Leave cupcakes to cool completely on a wire rack.
Frosting
Stir Milo into the milk until mixture turns chocolate coloured.
Beat the icing sugar, butter and cocoa powder with an electric mixer until well mixed.
Slowly add in the milk mixture. Once all the milk has been added, turn the mixer to high speed and continue beating until the frosting is light and fluffy (around five minutes).

Have fun :) Try it out and let me know how it goes ;)
xx,
TBG
Friday, 1 June 2012
Back from a holiday, time to start working
I had been away at Bintan for 5 days. It was an awesome getaway. There were so many activities in Club Med Bintan that 5 days is just not enough for us to cover everything. This is the first holiday that was fully packed with activities. We were busy from morning to night, not that I am complaining as the activities were very enjoyable and everyday is just a happy day.

 There was a feedback that a stronger Mint taste would be preferred but nevertheless it tasted yummy. ^^V Okie dokie! Noted. Will improve on it the next time :)


Back from holiday means no more playing TT
I had been busy working on orders from TBG's friends who were very appreciative of the sweet treats that I had baked. I am really glad to have them enjoying those sweet treats. It really made my day ^^
Every since I am back, I had been baking piles and piles of Choux!!!! (These are just a portion of it =x)

Not only that, I had been baking Mousse Cakes as well. And a 'New Cake on the Block' Lychee Mint~ :)

The typical mango cake :)

The Famous Mango Blackcurrent mousse Cake :D

Opps actually prior to this busy week and my trip to Bintan, there was another event held at a friend's company. You know the monthly birthday celebration that company holds for their staff. Yup yup that is the one.
The above Mango Blackcurrent Mousse Cake (ok this kinda long name to type and remember, it shall be called in abbreviation as MBM) is one of the cakes that they ordered.
Otherthan that, hot Scones, tarty Lemon Tarts, Apple Tarts and not forgetting Choux were present at the party. They were happily being ermmm 'eaten' by someone who appreciates them (haha this sentence doesnt sound right..)
Anyhow, Lemon tart proved to be subjective to person where it somewhat has an acquired taste. I should topped it with meringue the next time. Not only will it be more attractive, texture wise would be good as well as the tart will be less tangy and tarty..
Presenting to you the sweet treats that attended the party...we have Mr Scones. Hunky and Hot!

Then we have 'I will wake you up' Lemon Tart

'Don't judge a book by it's cover' Apple tart

and finally...the 'Explosive' Choux

I will be keeping myself busy with projects that I set for myself. In the month of june, I shall dedicate this month to my 大姐 (Big Sister) who loves Lychee. It shall be Lychee month where I will try to make many different combination of Lychee sweet treats :) Stay tune for it.
xx,
TBG
Subscribe to:
Posts (Atom)